Way back in December 2008 I blogged my . The post appears to have been relatively popular, remaining amongst the blogs top 5 posts according to Google analytics – I hope that it helped a few of those people going through the same pain points that I had to back then.
Since 2008, we have continued to use ISA server 2006 SP1 to publish our MOSS sites without any major problems, and I was pleased to learn recently that ISA server . Whilst many customers will likely upgrade to Forefront UAG (which includes a rich set of policy based security features), I will hazard a guess that some will continue to use ISA server given that it is still supported in a 32-bit environment (in fact, it does not support a 64-bit OS). After all, purchasing or upgrading a set of hardware to support SharePoint 2010 in the first place (requires 64-bit Windows Server 2008) is inevitably a costly exercise given its resource requirements. Note that while it is fully supported by Microsoft, I do not recommend that ISA server 2006 SP1 be your first choice for a SharePoint 2010 gateway product – the products support lifetime is obviously limited compared to (for example) UAG given that ISA was released in 2006.
Although I have been considering blogging about SharePoint 2010 and ISA server for some time, it was a that gave me the incentive to fire up MS Word (SharePoint 2010 supports publishing directly from Word to your blog site):
“webmarkx: @benjaminathawes Would you happen to have an update or guidance for publishing SP2010 via ISA2006 (just read ur previous blog)?”
My response at the time to Joe was that the guidance posted in that blog hasn’t really changed much: SP1 is still the latest service pack (essential in my opinion), I still recommend SSL bridging for security / simplicity and authentication should be performed at the ISA (proxy) server to protect your SharePoint WFE servers. One change I would suggest is avoiding the use of the windows hosts file and instead using the ISA server monitoring functionality to confirm that traffic proxied via the ISA server is in fact going to the correct Web server. This advice is based on my recent experience publishing a set of load-balanced SharePoint Web servers: forcing a connection to a single static IP address bypasses any load balancing you may have set up – and the monitoring functionality provided in SP1 should be used instead given that it is great for troubleshooting DNS issues. If you are wondering how to go about load balancing SharePoint servers using ISA Server 2006, I encourage you to read – let me know if you do have any queries.
Another recommendation from me would be to deploy your proxy servers as VMs. Not only does this remove the need to deploy ISA server on a 32-bit physical machine (not exactly easy to upgrade), but virtualisation provides you with additional flexibility and (in the case of ISA server) can save you some serious accessibility headaches – see step 1 below for more details. The relatively low hardware requirements of ISA server (I have known clients with small SharePoint 2007 farms to use machines with a single CPU and 1GB of RAM without any issues) make virtualisation an even more attractive scenario. Disk IO requirements, CPU cycles and physical memory usage are all very low compared to the various SharePoint 2010 server roles (WFE, Query, Index, DB).
A third recommendation is to delegate basic authentication credentials to your SharePoint WFE servers – this is based on intermittent session state issues that I have encountered in the past attempting to delegate NTLM credentials via a proxy server. If security is a concern (it probably should be), using basic authentication means that an SSL connection is mandatory given that credentials are sent in plain text. You may well have more luck in your own environment using NTLM – or Kerberos for improved performance.
Given the popularity of the original post, I thought it would be useful to provide a step-by-step walkthrough of the steps involved in setting up SharePoint 2010 with an ISA server. Note that these steps are by no means complete and are sufficient only for a test environment – for a live environment you will want to consider placing the ISA server in an existing firewalls DMZ segment, using SSL with HTTPS bridging and redundancy (i.e. an ISA server array) in order to provide high availability.
Note that I am installing ISA Server on a Windows Server 2003 R2 32-bit VM – I figure that any organisation considering sticking with ISA Server 2006 would likely avoid upgrading to Windows Server 2008 for now, especially considering that .
These steps apply to the following environment:
- ISA Server installed on a separate 32-bit Windows Server (64-bit is not supported).
- ISA Server 2006 Standard or Enterprise SP1.
- ISA Server is a domain member or is located in a trusted domain (necessary for Windows Active Directory validation).
- ISA Server is configured to delegate basic authentication credentials to published SharePoint servers.
- ISA Server is being used in a Web publishing (proxy) only scenario (i.e. unihomed with a single NIC). .
- SharePoint 2010 Foundation, Standard or Enterprise.
- HTTPS bridging used between the ISA and SharePoint WFE servers, due to the fact that we are delegating basic authentication.
- WFE servers (and the appropriate Web applications) configured for basic authentication and confirmed working.
- HTML forms-based authentication used.
Overview of steps:
- Prerequisites – a cautionary note
- Install ISA Server 2006 SP1
- Apply single network adapter template for Web publishing
- Configure Web listener
- Configure publishing rules
- Configure hosts file (test scenario only)
-
Test and confirm access
1. Prerequisites – a cautionary note
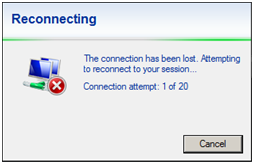
The severity of failing to carry out this pre-requisite step can range from mild embarrassment (test scenarios) to a serious service availability problem in the case of a live environment. ISA Server 2006 is at heart a firewall product which explains why by default, itblocks off all access to the outside world, including RDP following successful installation. Now, you may not even notice this behaviour if working within a VM but – take it from someone that has been there – you will certainly notice if you are working on a physical ISA server remotely via RDP. This behaviour is one reason I would recommend deploying proxy servers as virtual machines. If that is not possible and a physical installation is required, I strongly recommend installing the software locally rather than remotely in order to remove any chance of accessibility issues following installation.
Upon successful installation, this is what you will be presented with if you are attempting to install ISA server remotely – you have been warned!
2. Install ISA Server 2006 SP1
For our test scenario, select the default options up until the “Internal Network” selection screen. In a unihomed Web proxy only scenario, we effectively want all IP traffic to be considered internal. To do this, simply select “Add adapter” and choose the NIC you wish to use for all communication to your SharePoint server(s):
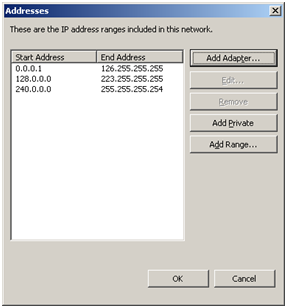
Use the “Add Adapter” option to include all IP addresses.
As an aside at this point, the first thing I typically following a successful installation in a real-world scenario is configure a “remote management” (administrator) computer group. This group is permitted access to the ISA server even in the event that the server enters (a defence mechanism that protects your published servers in the event of a critical event occurring on the ISA server. This option is configurable within Firewall Policy > Toolbox > Computer Sets > “Remote Management Computers”.
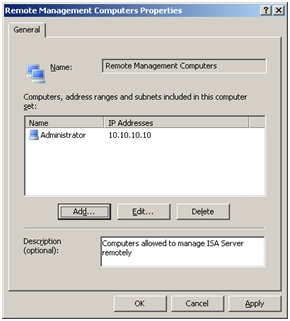
Configure a set of remote management computers to permit administrative access during lockdown mode.
3. Apply single network adapter template for Web publishing
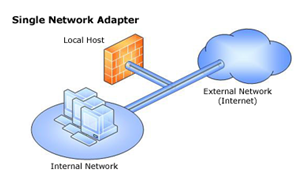
Single network adapter layout for unihomed Web publishing scenarios.
By default, ISA Server 2006 applies the “Edge Firewall” template which is used to connect an internal network to the Internet. In our case however, I am assuming that an edge firewall is already in place (perhaps a hardware firewall or another ISA Server), and that our ISA server is going to be used as a Web publishing only server. For this scenario, select the “Single Network Adapter” template within Configuration > Networks > Templates. ISA Server will offer you the chance to export your existing configuration, warning you that the existing settings will be overwritten. It probably goes without saying that carrying out this step on a working environment will most likely render it nonoperational – in our case however I am assuming you are following these steps within a brand new test environment.
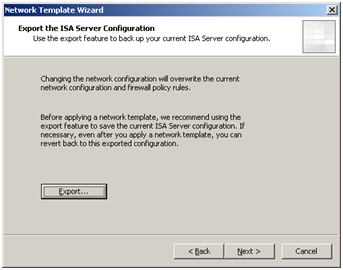
ISA Server offers you the chance to export your existing configuration.
4. Configure Web listener
Web listeners specify how ISA server listens for and authenticates incoming Web requests from clients – we will need to create on in order to permit access to our SharePoint 2010 site. To do this, navigate to Firewall Policy > Toolbox > Network Objects > New > “Web Listener”.
You will shortly be prompted to choose whether or not an SSL connection is required with clients. In a live environment where security is a concern, I strongly suggest you select “Require SSL secured connections with clients”. However, in our case we will opt not to require SSL for simplicity, meaning client credentials will be sent unencrypted. Note that if you choose to delegate basic credentials later on, SSL is your only real option here for a live environment given that credentials are sent in plain text.
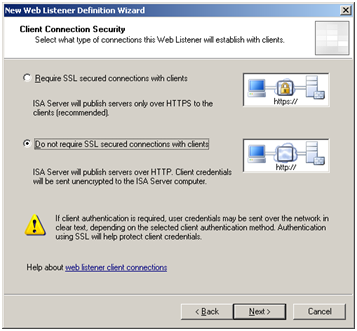
Allowing unencrypted (HTTP) connections is only appropriate for environments where security is not a concern.
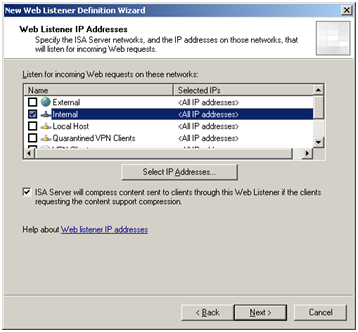
Select the “Internal” ISA server network.
The next stage relies on the ISA server either being a domain member, or in a domain that is trusted in order to permit Active Directory validation. HTML forms authentication provides a customisable (i.e. branded), secure method of publishing a SharePoint 2010 site:
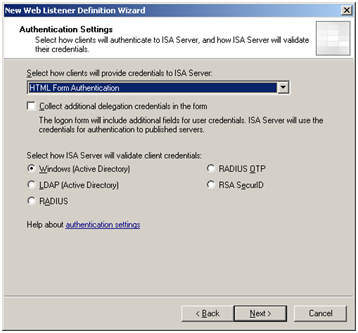
Select the “HTML Form Authentication” and ensure “Windows (Active Directory)” is selected.
Single Sign On in the contact of ISA server is useful in cases where several SharePoint sites are being published that are sharing common SSO domain named URLs. For example, alpha.contoso.com and bravo.contoso.com. Assuming users are either using a persistent cookie or are accessing multiple SSO domain named sites within the same browser session, they will not have to re-authenticate which can certainly save a few keystrokes:
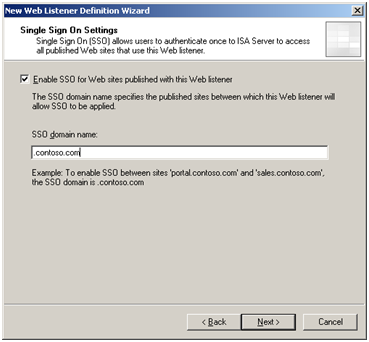
Enabling SSO is an optional step that minimises the need to re-authenticate across sites using a SSO domain name.
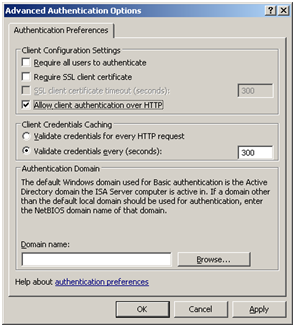
Follow the on-screen instructions to allow client authentication over HTTP within the new Web listener properties (test environments only).
5. Configure publishing rules
Once you have configured a Web listener, the last step in providing access to your SharePoint 2010 sites via your ISA server is to create a set of publishing rules. By default, ISA server will deny all traffic attempting to traverse it (it is, after all a firewall product). Publishing rules are evaluated in numerical order from top to bottom – if a rule is found that matches the request, all subsequent matching rules will be ignored.
Start by going to Firewall Policy > Tasks > Publish SharePoint sites. In our case we are going to publish a single SharePoint Web site:
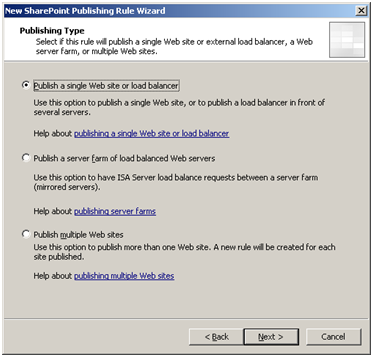
Select to publish a single SharePoint Web site.
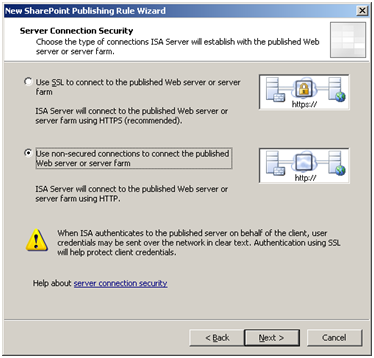
Select to use non-secured connections for this test scenario.
For our test scenario, we will be verifying access to the SharePoint site from the SharePoint WFE server – but with a twist: we will be viewing the site via the ISA server (i.e. WFE > ISA > back to WFE) in order to avoid any loopback issues on the ISA server. In order to ensure traffic is directed to the correct IP address, I suggest specifying the IP rather than rely on a DNS lookup (in this case, we will manually configure the site name to resolve to the ISA server using the SharePoint Server’s Windows hosts file). Note that in a production environment, you would likely be forwarding IP traffic from an edge firewall to your ISA server (Firewall > ISA > WFE), so a DNS lookup should be used in order to ensure load balanced traffic is sent to the correct server(s). This scenario assumes that www.sitename.com is a SharePoint 2010 site has already been configured to use basic authentication:
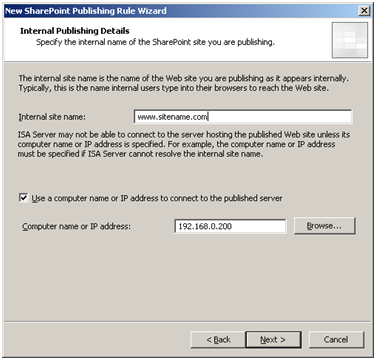
Manually enter the IP address of your SharePoint site to avoid any potential DNS lookup issues.
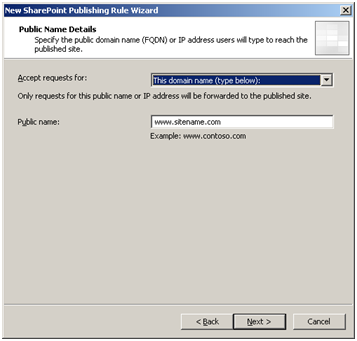
For simplicity, ensure the public site name is the same as the internal site name entered in the previous step.
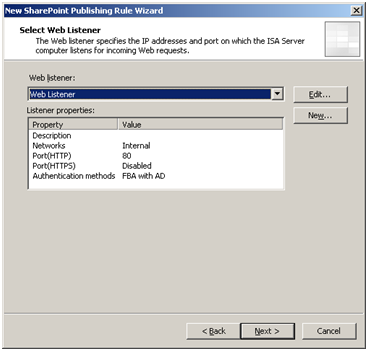
Select the Web listener created earlier.
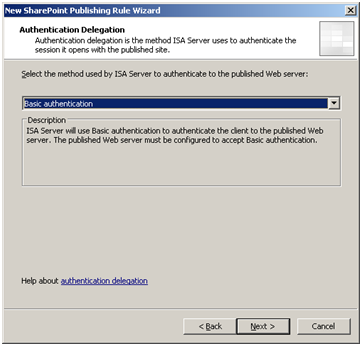
Ensure basic authentication is selected.
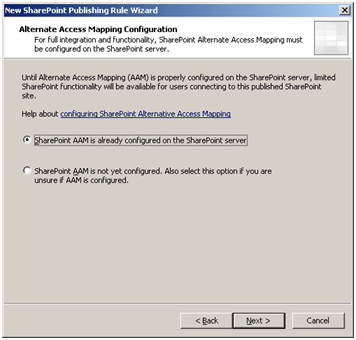
Our scenario assumes AAM has already been configured on the SharePoint site.
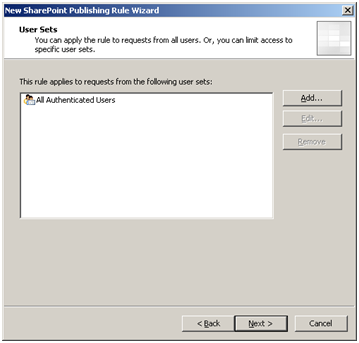
Selecting “All Authenticated Users” ensures that all traffic is authenticated with AD via the ISA server.
6. Configure hosts file (test scenario only)
At this stage, ISA Server configuration is complete. The final step in ensuring access to our SharePoint site is to ensure that the SharePoint WFE server resolves www.sitename.com to the appropriate IP address on the ISA server (i.e. NOT your SharePoint WFE server). To do that, we are simply going to edit the Windows hosts file on the SharePoint server located in “C:WINDOWSsystem32driversetc”. Open it up with notepad and add an entry in the form ” 192.168.0.100 www.sitename.com”:
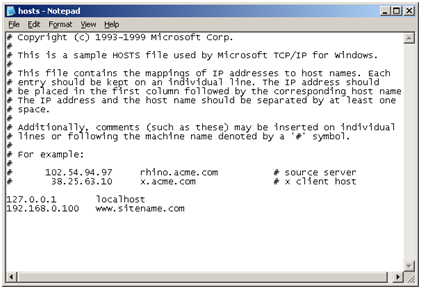
Add a hosts file entry on your SharePoint WFE to ensure that your SharePoint site name resolves to the NIC IP on the ISA server.
7. Test and confirm access
Close all open browsers on the SharePoint server, then perform an “ipconfig /flushdns” at the command prompt. Attempt to ping your SharePoint site and ensure you can resolve to the ISA server IP. With any luck you will be presented with the default ISA server HTML logon form:
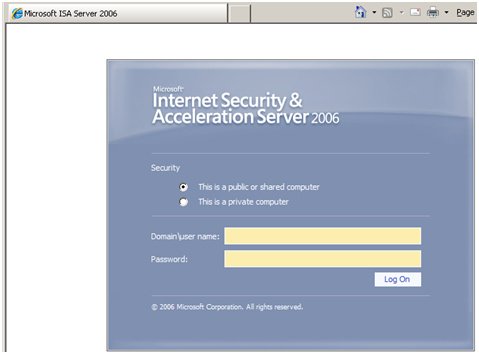
ISA Server 2006 HTML logon form.
Access to SharePoint 2010 team site via ISA Server 2006 SP1 using basic authentication delegation.
If you are unable to access the site, it could be due to one of the following:
- The SharePoint site is not configured correctly. Try accessing the site directly without the ISA server first, using the same credentials that you are trying to authenticate from the ISA server with.
- The ISA server is not a domain member or located in a trusted domain. This is required for AD authentication.
- You have a loopback issue. Ensure that the ISA server is forward requests to the SharePoint site, as opposed to its own NIC IP. Packets should travel from WFE > ISA > WFE in this test scenario.
I hope that all makes sense. Feel free to if you have any queries. Good luck!